Spring Bean初始化过程

init-method方法

init-method方法,初始化bean的时候执行,可以针对某个具体的bean进行配置。init-method需要在applicationContext.xml配置文档中bean的定义里头写明。例如:

1
<bean id="TestBean" class="nju.software.xkxt.util.TestBean" init-method="init"></bean>

这样,当TestBean在初始化的时候会执行TestBean中定义的init方法。

afterPropertiesSet方法

1
2
3
4
5
6
7
8
9
10
11
12
13
public interface InitializingBean {

/**
* Invoked by the containing {@code BeanFactory} after it has set all bean properties
* and satisfied {@link BeanFactoryAware}, {@code ApplicationContextAware} etc.
* <p>This method allows the bean instance to perform validation of its overall
* configuration and final initialization when all bean properties have been set.
* @throws Exception in the event of misconfiguration (such as failure to set an
* essential property) or if initialization fails for any other reason
*/
void afterPropertiesSet() throws Exception;

}

afterPropertiesSet方法,初始化bean的时候执行,可以针对某个具体的bean进行配置。afterPropertiesSet 必须实现 InitializingBean接口。实现 InitializingBean接口必须实现afterPropertiesSet方法。

BeanPostProcessor类

BeanPostProcessor,针对所有Spring上下文中所有的bean,可以在配置文档applicationContext.xml中配置一个BeanPostProcessor,然后对所有的bean进行一个初始化之前和之后的代理。BeanPostProcessor接口中有两个方法: postProcessBeforeInitializationpostProcessAfterInitializationpostProcessBeforeInitialization方法在bean初始化之前执行, postProcessAfterInitialization方法在bean初始化之后执行。

前置后置处理器

Spirng中BeanPostProcessorInstantiationAwareBeanPostProcessorAdapter两个接口都可以实现对bean前置后置处理的效果,那这次先讲解一下BeanPostProcessor处理器的使用

先看一下BeanPostProcessor接口的源码,它定义了两个方法,一个在bean初始化之前,一个在bean初始化之后

1
2
3
4
5
6
7
8
9
10
11
public interface BeanPostProcessor {
   @Nullable
   default Object postProcessBeforeInitialization(Object bean, String beanName) throws BeansException {
       return bean;
  }

   @Nullable
   default Object postProcessAfterInitialization(Object bean, String beanName) throws BeansException {
       return bean;
  }
}

下面,我们来实现这个类,测试一下Spring中的前置后置处理器吧

首先是pom.xml,增加Spring相关的依赖

1
2
3
4
5
6
7
8
9
10
11
12
13
14
15
16
17
18
19
20
21
22
23
24
25
26
27
28
29
30
31
32
33
34
35
36
37
38
39
40
41
42
43
44
45
46
47
48
49
50

<project xmlns="http://maven.apache.org/POM/4.0.0" xmlns:xsi="http://www.w3.org/2001/XMLSchema-instance"
 xsi:schemaLocation="http://maven.apache.org/POM/4.0.0 http://maven.apache.org/xsd/maven-4.0.0.xsd">
 <modelVersion>4.0.0</modelVersion>

 <groupId>com.myspring</groupId>
 <artifactId>myspring</artifactId>
 <version>0.0.1-SNAPSHOT</version>
 <packaging>jar</packaging>

 <name>myspring</name>
 <url>http://maven.apache.org</url>

 <properties>
   <project.build.sourceEncoding>UTF-8</project.build.sourceEncoding>
 </properties>

 <dependencies>
   <dependency>
     <groupId>junit</groupId>
     <artifactId>junit</artifactId>
     <version>3.8.1</version>
     <scope>test</scope>
   </dependency>
   <!-- Spring 5.0 核心工具包 -->
<dependency>
<groupId>org.springframework</groupId>
<artifactId>spring-core</artifactId>
<version>5.0.7.RELEASE</version>
</dependency>
<!-- Spring 5.0 Bean管理工具包 -->
<dependency>
<groupId>org.springframework</groupId>
<artifactId>spring-beans</artifactId>
<version>5.0.7.RELEASE</version>
</dependency>
<!-- Spring 5.0 context管理工具包 -->
<dependency>
<groupId>org.springframework</groupId>
<artifactId>spring-context</artifactId>
<version>5.0.7.RELEASE</version>
</dependency>
<!-- Spring 5.0 aop支持包 -->
<dependency>
<groupId>org.springframework</groupId>
<artifactId>spring-aop</artifactId>
<version>5.0.7.RELEASE</version>
</dependency>
 </dependencies>
</project>

定义一个测试接口:

1
2
3
4
public interface BaseService {
String doSomething();
   String eat();
}

定义接口实现类:

1
2
3
4
5
6
7
8
9
10
public class ISomeService implements BaseService {

public String doSomething() {
// 增强效果:返回内容全部大写
return "Hello i am kxm";
}
public String eat() {
return "eat food";
}
}

实现BeanPostProcessor接口

1
2
3
4
5
6
7
8
9
10
11
12
13
14
15
16
17
18
19
20
21
22
23
24
25
26
27
public class MyBeanPostProcessor implements BeanPostProcessor  {
// 前置处理器
public Object postProcessBeforeInitialization(Object bean, String beanName) throws BeansException {
Class beanClass = bean.getClass();
if (beanClass == ISomeService.class) {
System.out.println("bean 对象初始化之前······");
}
       return bean;
  }

// 后置处理器 --- 此处具体的实现用的是Java中的动态代理
   public Object postProcessAfterInitialization(final Object beanInstance, String beanName) throws BeansException {
       // 为当前 bean 对象注册监控代理对象,负责增强 bean 对象方法的能力
       Class beanClass = beanInstance.getClass();
       if (beanClass == ISomeService.class) {
           Object proxy = Proxy.newProxyInstance(beanInstance.getClass().getClassLoader(),beanInstance.getClass().getInterfaces(), new InvocationHandler() {
public Object invoke(Object proxy, Method method, Object[] args) throws Throwable {
System.out.println("ISomeService 中的 doSome() 被拦截了···");
                   String result = (String) method.invoke(beanInstance, args);
                   return result.toUpperCase();
}
});
           return proxy;
      }
       return beanInstance;
  }
}

Spring的配置文件如下:

1
2
3
4
<!-- 注册 bean:被监控的实现类 -->
<bean id="iSomeService" class="com.my.spring.beanprocessor.ISomeService"></bean>
<!-- 注册代理实现类 -->
<bean class="com.my.spring.beanprocessor.MyBeanPostProcessor"></bean>

测试类如下:

1
2
3
4
5
6
7
8
9
10
11
public class TestBeanPostProcessor {

public static void main(String[] args) {
/**
* BeanPostProcessor 前置后置处理器
*/
ApplicationContext factory = new ClassPathXmlApplicationContext("spring_config.xml");
BaseService serviceObj = (BaseService) factory.getBean("iSomeService");
System.out.println(serviceObj.doSomething());
}
}

测试结果截图:

https://img-blog.csdn.net/20180924211535371?watermark/2/text/aHR0cHM6Ly9ibG9nLmNzZG4ubmV0L3dlaXhpbl80MDgzNDQ2NA==/font/5a6L5L2T/fontsize/400/fill/I0JBQkFCMA==/dissolve/70

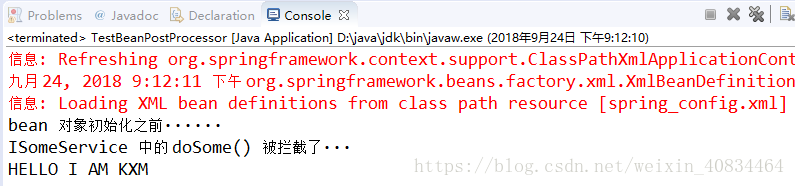
可以观察到,我们明明在代码中对于doSomething方法定义的是小写,但是通过后置处理器,拦截了原本的方法,而是通过动态代理的方式把方法的结果进行了一定程度的改变,这就是Spring中的前置后置处理器—-BeanPostProcessor

总之,afterPropertiesSetinit-method之间的执行顺序是afterPropertiesSet 先执行,init-method 后执行。从BeanPostProcessor的作用,可以看出最先执行的是postProcessBeforeInitialization,然后afterPropertiesSet,然后是init-method,然后是postProcessAfterInitialization

参考文章

如果大家喜欢我的文章,可以关注个人订阅号。欢迎随时留言、交流。

简栈文化服务订阅号